Showing posts with label blogger trick. Show all posts

Browse > Home / / 3 Blogger Toolbar Like a Wordpress


3 Blogger Toolbar Like a Wordpress

2 comments
Wednesday, May 05, 2010 Posted by One-4-All

3 Blogger Toolbar Like a WordpressLong time i doesn't make any post about blogger trick or blogger tutorial. Now i want to start make it again in this blog. What i want write here now? I want to make some post about blogger toolbar.

Blogger toolbar serves as a means of persistently presenting visitors to a website with a means of quickly performing many common site functions such as sharing articles of content on a social network, searching through the home website or presenting features which further enhance the community-aspects to a website such as live chat features.

Many people installed it in their sites, especially who have blog with wordpress blogging platform. Maybe there are a lot of provider for that platform. But how if we don't have wordpress blog? We just have blog with blogger blogging platform. Now blogger can also installed this toolbar and it become like a wordpress sites. There are 3 blogger toolbar like a wordpress that blogger can have too.

  1. Wibiya Toolbar

  2. 3 Blogger Toolbar Like a Wordpress
  3. Meebo Toolbar

  4. 3 Blogger Toolbar Like a Wordpress
  5. Gigya Toolbar

  6. 3 Blogger Toolbar Like a Wordpress


Is it advantages that we can get from this blogger toolbar? Yes, of course.
  1. Increase Page Views
    • Engage readers and raise page views with apps such as Latest Posts, Real Time Users, and More...
    • Gain traffic from the social web
    • Track your traffic growth through simple analytics tools

  2. Communicate With Your Readers
    • Broadcast messages, alerts and more to all your visitors in real time
    • Share your latest tweets with your readers in real time
    • Participate in live chat rooms with your audience

  3. Power Tools
    • Discover a growing range of applications to enrich your readers experience
    • Full tracking and management system for each application and effectiveness to your website
    • Add and remove applications in just one click

Get, Install, and enjoy.

Read More

Browse > Home / / Why I Should Have a Blog?


Why I Should Have a Blog?

2 comments
Monday, April 26, 2010 Posted by One-4-All

Why I Should Have a Blog?Maybe you are familiar with one word, Blog. Blog become more popular right now. Many people have their own blogs. Not just one blog, there are a people who have a lot of blogs with different topic. There are talking about Blogger tutorial, Blogger trick, tools, and template, Business, and many else. I think blogging is the nice and interesting world. logging used to be just a method for stating your opinion, but now blogs are used to opine, to review, and to sell. In fact, many Internet marketers base their entire business around blogging.

So, one questions that are ready to answer. Should i need a blogging? why?

I have started to blogging about 9 months ago. Now, i really enjoy to do it. I have started it with zero knowledge. When i started it i really wasn't know how to made it. Now i have several blog. There are Blogger Template Place, One-4-All, and another else. I think you are want to ask me about what that i got from my blog, right?

There are a lot of advantages that you can reach with your blog.
1. Blogging can build your learning desire
Like i said before that i just started it without any knowledge. I don't know about internet. Honestly i was graduated as material engineer, not as internet or multimedia engineer. But it not make me down. I must learn how to make it. I started to buy some blogger tutorial Books, read and tried it.

Another case is about my language. I come from indonesia, and my english is too bad. But now it really needed. When you want to start get money from internet, you must prepare your english. My friends was told me that i can get some bucks from internet, but i should make a blog with english language. So, i need to upgrade my skills.
2. Blogging can make a nice friendship
Another thing that you can get from blogging is friendship. Friendship is important thing. You can share everything. They will already when you need. Blogging can be one media to make your friendship. When you publish some article, for example blogger tutorial or free blogger template, people who come to your blog will leave a comment. It can be start point to make a friendship.
3. You can make money with your blog
This is one of advantages that you can get from your blog. Maybe it is the most purpose from several people to make a blog, and me too. As you know that now blogging are use for review and sell too. Advertiser use blogs as their promotion media, because they are more cheaper and more effective than conventional promotion media. Many people have success with their blog and get a lot of money from it. You can see btemplates, 1stwebdesigner, psdtuts, and many else bloggers who become a rich people.

Many people not said that it is impossible to get a bucks form internet. But, i say that it is 100% true. I have got several bucks with my blogs even that is not a big amount. Whatever amount that you get, there is one point that blogs can be an alternative way as yours livelihood.

So, what do you think? Should we need a blogging?

Read More

Browse > Home / / Related Post With Thumbnail Image for Blogger


Related Post With Thumbnail Image for Blogger

4 comments
Tuesday, September 29, 2009 Posted by One-4-All

I think you was look this widget before. Yes, this widget have same look with Linkwithin widget. But, this image not from LinkWithin. This widget come from BloggerPlugin. I was installed in my blog. And i hope this can help my visitor to exploring my article.Do you interesting to install this blogger widget in your own blog? It's an easy way to do.

Here are the detailed installation steps.....

  • First of all Login to your blogger dashboard and navigate to Layout > Edit HTML and check the "Expand Widget Templates" check box.
  • Now look for this code
    </head>
  • Change that code into this one.

    <!--Related Posts with thumbnails Scripts and Styles Start-->
    <b:if cond='data:blog.pageType == &quot;item&quot;'>
    <style type="text/css">
    #related-posts {
    float:center;
    text-transform:none;
    height:100%;
    min-height:100%;
    padding-top:5px;
    padding-left:5px;
    }

    #related-posts h2{
    font-size: 1.6em;
    font-weight: bold;
    color: black;
    font-family: Georgia, &#8220;Times New Roman&#8221;, Times, serif;
    margin-bottom: 0.75em;
    margin-top: 0em;
    padding-top: 0em;
    }
    #related-posts a{
    color:black;
    }
    #related-posts a:hover{
    color:black;
    }

    #related-posts a:hover {
    background-color:#d4eaf2;
    }
    </style>
    <script src='http://blogergadgets.googlecode.com/files/relatedthumbs21.js' type='text/javascript'/>
    </b:if>
    <!--Related Posts with thumbnails Scripts and Styles End-->
    </head>
  • Now find

    <div class='post-footer-line post-footer-line-1'>
  • And then add this code

    <!-- Related Posts with Thumbnails Code Start-->
    <b:if cond='data:blog.pageType == &quot;item&quot;'>
    <div id='related-posts'>
    <b:loop values='data:post.labels' var='label'>
    <b:if cond='data:label.isLast != &quot;true&quot;'>
    </b:if>
    <b:if cond='data:blog.pageType == &quot;item&quot;'>
    <script expr:src='&quot;/feeds/posts/default/-/&quot; + data:label.name + &quot;?alt=json-in-script&amp;callback=related_results_labels_thumbs&amp;max-results=6&quot;' type='text/javascript'/></b:if></b:loop><a href='http://www.bloggerplugins.org/2009/08/related-posts-thumbnails-blogger-widget.html' style='display:none;'>Related Posts with thumbnails for blogger</a><a href='http://www.bloggerplugins.org/' style='display:none;'>blogger widgets</a>
    <script type='text/javascript'>
    var currentposturl=&quot;<data:post.url/>&quot;;
    var maxresults=5;
    var relatedpoststitle="Related Posts";
    removeRelatedDuplicates_thumbs();
    printRelatedLabels_thumbs();
    </script>
    </div><div style='clear:both'/>
    </b:if>
    <!-- Related Posts with Thumbnails Code End-->
  • Now you can adjust the maximum number of related posts being displayed by editing the red code.
  • Now save your edited HTML Template


This widget will be show an image in our post for a thumbnail. When your post doesn't have any image, it will be show "No Image" picture as thumbnail.

Best Regard.
One-4-All | Blogging News and Tips

Read More

Browse > Home / / Blogger Comment Avatar


Blogger Comment Avatar

3 comments
Sunday, September 20, 2009 Posted by One-4-All

New feature from blogger was launched Blogger Comment Avatar. Yes, it will be look like a wordpress style. Yesterday i was use MYBlogLog Comment avatar in this blog. But, sometime it can make my blog was have hard loading. My Bloglog comment avatar using a script. As you know, if we use a lot of script, it can make our blog become slow. Now, i was change MyBlogLog comment avatar with the original, Blogger Comment Avatar.

This feature was enable in template that provide by blogger. I mean when you are use another template, you must add some code in to your template source. If you want to enable Blogger Comment Avatar in your blog, here is several steps that you must doing.
  1. Login to your blogger account
  2. Click "Layout" Tab in your dashboard
  3. Click "Edit HTML"
  4. Find this code in your template source.
    #comments-block {.......}
    Add .avatar-comment-indent into that code. Now the code will be look like this one.
    #comments-block .avatar-comment-indent {........}
  5. After you modified that code, there are another code that you must add in your template. Find this code in your HTML source
    <dl id='comments-block'>
    Change it into this one.
    <dl expr:class='data:post.avatarIndentClass' id='comments-block'>
  6. Below in that code, you will find this one.
    <b:loop values='data:post.comments' var='comment'>
    Now, you must add this code right after that code.
    <dt expr:class='&quot;comment-author &quot; + data:comment.authorClass' expr:id='data:comment.anchorName'>
    <b:if cond='data:comment.favicon'>
    <img expr:src='data:comment.favicon' height='16px' style='margin-bottom:-2px;' width='16px'/>
    </b:if>
    <a expr:name='data:comment.anchorName'/>
    <b:if cond='data:blog.enabledCommentProfileImages'>
    <data:comment.authorAvatarImage/>
    </b:if>
  7. Now the last step is add the closing code. Scroll down your mouse and you will find the closing code "<b:/loop>".
    Add Another closing code "</dt>" before that one, and save your edited template source.

Here the result that i have made in my blog.
Blogger Avatar
But, an avatar image will be show when you or somebody using a blogger account in their comments. It will not appear if using Name/URL in their comments. Hope this blogger trick tutorial will have you to enable new blogger feature.

Best Regard
One-4-All | Blogging News and Tips

Read More

Browse > Home / / Wibiya Toolbar


Wibiya Toolbar

0 comments
Tuesday, September 01, 2009 Posted by One-4-All

When i was look for web or blog who can publish my converted template in their own web, i found some toolbar. The toolbar with a lot of function. I think it is a lovely toolbar. Like i said before that this toolbar have a lot of function, like integrated a recent post, subscribe feature, share to social bookmarking button, translate, and a lot of another features. It is from wibiya. So i call it Wibiya Toolbar.
Wibiya ToolbarWibiya toolbar is free service that offer by wibiya. You can install this toolbar into your blog or web. This toolbar is available from any blogging, like a blogspot, wordpress, Typepad and another platform. I have installed this toolbar in my blog, Blogger Template place and in this blog. Look up in the bottom area.

To install this toolbar, first you must ask to Wibiya.com to join or get this toolbar. You will get notification from Wibiya when your account or your web get approved. I have get this notification in 2 or 3 day business. So wait it.

After you get notification, you can installed it with easy step into your blog or web. I want share installation step then i mean above.
  1. Looking up for notification email from Wibiya in your mail. That notification email consist a activation link to activate your wibiya account. Click that activation link and you will redirect to login screen in wibiya.
  2. When you was login into wibiya.com, you will be ask to input your blog information.
    Wibiya Toolbar
  3. Next step is you will ask to choose a toolbar that you want to install in your blog.Wibiya Toolbar Installation StepThey offer a lot of different color. You can choose the best one for your blog.
  4. After you choose the toolbar, you will asked to choose a features that you want install in that toolbar.
  5. If you have recent post feature (feed) and twitter for your toolbar, you must fill a feed address and your twitter ID.Wibiya Toolbar
    And then click "Next"
  6. When you click next button, there are a question about blogging platform. I have used blogger platform for my blog, so i click blogger icon on that screen
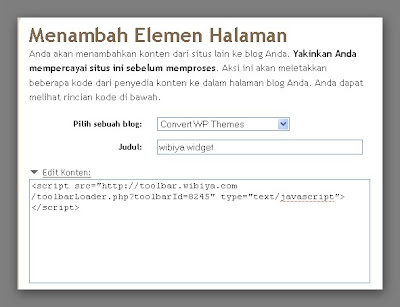
  7. When you click blogger platform, your browsing screen will get get a pop up notification. Allowed it, and you will see installation wizard. You can use automatic installation wizard, or you can install by your self. I choose to install by my self. When you choose to install by your self you must click "edit content" and you will see a script. Copy that script and paste into your blog template before </body>.Wibiya Toolbar
  8. Save your template
There are a pictures about Wibiya toolbar feature.
Wibiya ToolbarWibiya Toolbar
Wibiya Toolbar

Get this toolbar for you blog or web, and make your visitor have a nice navigation to explore your blog.

Another blogger trick, you can install avatar on your blog comment or you can install Related Post Widget. Look up this article Install Avatar and Related Post Widget for get this trick.

Best Regard
One-4-All

Read More

Browse > Home / / Add Retweet Tweetmeme Button


Add Retweet Tweetmeme Button

6 comments
Saturday, August 29, 2009 Posted by One-4-All

Twitter is getting more and more famous and so is retweet Most of you might be knowing of both of this.Still i will give a brief into on both. Like as you know that twitter is one of microblogging.
Microblogging, a relatively new tool of the social Web, allows users to publish short blog posts or messages, typically fewer than 140 characters, through their computers and mobile phones It’s a helpful way to keep your name in front of people and to announce and highlight new blog posts, upcoming
events (such as blog contests or carnivals), and more. The possibilities are virtually limitless! Think of it as free publicity. Retweet, This one enables to report repost some interesting tweets on twitter.The retweet button can act more like a tweet counter. We can add retweet button into our article to get more retweet from our visitor who like and enjoy our post. I was added it in my blog, and the result become like this picture.

To add this button, you must add some code into your template code. There are three option for you, according to the position and button shape.
  1. Add Retweet button in your right side of post with compact style.
    Add this code into your template.
    <div style="float:right;padding:4px;">
    <script type="text/javascript">
    tweetmeme_style = 'compact';
    tweetmeme_url = '<data:post.url/>';
    tweetmeme_source = 'your_twitter_user_name';
    </script>
    <script type="text/javascript" src="http://tweetmeme.com/i/scripts/button.js"></script>
    </div>
  2. Add Retweet button in your left side of post with compact style.
    Add this code into your template.
    <div style="float:left;padding:4px;">
    <script type="text/javascript">
    tweetmeme_style = 'compact';
    tweetmeme_url = '<data:post.url/>';
    tweetmeme_source = 'your_twitter_user_name';
    </script>
    <script type="text/javascript" src="http://tweetmeme.com/i/scripts/button.js"></script>
    </div>
  3. Add Retweet button in your left side of post with large style.

    <div style="float:left;padding:4px;">
    <script type="text/javascript">
    tweetmeme_url = '<data:post.url/>';
    tweetmeme_source = 'your_twitter_user_name';
    </script>
    <script type="text/javascript" src="http://tweetmeme.com/i/scripts/button.js"></script>
    </div>
  4. Add Retweet button in your left side of post with large style.

    <div style="float:right;padding:4px;">
    <script type="text/javascript">
    tweetmeme_url = '<data:post.url/>';
    tweetmeme_source = 'your_twitter_user_name';
    </script>
    <script type="text/javascript" src="http://tweetmeme.com/i/scripts/button.js"></script>
    </div>

You must add into your template before this code.
<p><data:post.body/></p>
So, the final code will become like this.
<div style="float:right;padding:4px;">
<script type="text/javascript">
tweetmeme_url = '<data:post.url/>';
tweetmeme_source = 'your_twitter_user_name';
</script>
<script type="text/javascript" src="http://tweetmeme.com/i/scripts/button.js"></script>
</div>
<p><data:post.body/></p>


Enjoy this and don't forget to Retweet or bookmark this article.

Best Regard
One-4-All

Read More

Browse > Home / / Disquss Comments Form For Blogger


Disquss Comments Form For Blogger

2 comments
Thursday, August 27, 2009 Posted by One-4-All

Want have different comments form style for your blog? like a wordpress comments style? Yes, i think Wordpress comments have a great style. There be can replied a comments just right below the comment. So someone who have question that write in comments form can be reply. Unfortunately, Blogger comments form can't be change to make it happen. But, the problem was solved now. There are a free service who provide a comments form like wordpress for our blog, Disquss.

Disquss comments is a comment system and moderation tool for your site. This service lets you add next-gen community management and social web integrations to any site on any platform. Hundreds of thousands of sites, from small blogs to large publications, rely on Disqus Comments for their discussion communities. Disquss comments have a form like this picture below.

To get this comments style into your blog is simple thing do. You just go to Disquss Web and then follow the instruction in their web. Their instruction very clearly, so anyone can do it.
  1. Fisrt you must registering your site and moderator profile
  2. Choose your blog platform
  3. Upload your template code into disquss
  4. Replace your old template code with the new one
  5. Save your new template
  6. The last thing, you just see the result in your blog
There are so simple right? So get a new comments style for your blog now, and be different from the others. Look up for my dummies blog to see the comments style, DEMO.

Best Regard
One-4-All

Read More

Browse > Home / / Install Avatar In Blogger Comments


Install Avatar In Blogger Comments

9 comments
Sunday, August 23, 2009 Posted by One-4-All

One of thing that i like form wordpress is their comments form have avatar feature. When some body leave a comment, it will be appear avatar on their comments form. It will be great thing if it can be on blogspot comments form too. But, unfortunately blogger doesn't support it for their comments form.

What is avatar? Avatar is an image (or icon) which is unique to the person who is making the comment. When using comment avatars in your blog, you will easily be able to recognize comment authors, especially those who regularly visit your blog. Also I feel this adds a greater sense of interaction between blog authors and their readers.

Avatar
But now you can install avatar in blogger comments form using MyBlogLog.
MyBlogLog is a social network for the blogger community that is based in part on interactions facilitated by a popular web widget that many members install on their blog. Bloggers can then display widgets on their sites which show MyBlogLog online community members who have recently visited their page. These widgets also contain links to visiting members' community pages, and are one way in which users connect with one another.

There are several steps if you like to install avatar in blogger comments.

  • Log in to your blogger account
  • Click Layout Tab Option on your dashboard
  • Click Layout Tab Option on your dashboard, dont forget to Check Expand Widget Templates
  • Add this script into your template code before </head>
  • <script type='text/javascript'>
    //<![CDATA[
    /*
    Merlinox and Napolux MyBlogLog Avatar Creator
    created by Merlinox (blog.merlinox.com)
    helped by Napolux (www.napolux.com)

    version 0.1 (20061214)
    version 0.2 (20061215)
    compatible with all blogger blog
    */

    if(typeof(myLayer)!='function'){
    function myLayer (x){
    //individuo l'oggetto
    if(document.layers){ // browser="NN4";
    lay=document.layers[x];
    }
    if(document.all){ // browser="IE";
    lay=eval("document.all." + x);
    }
    if(!document.all && document.getElementById){ // browser="NN6+ or IE5+ if you're willing to dump the !document.all stuff";
    lay=document.getElementById(x);
    }
    return lay;
    }
    }

    //lo prendo da blogger
    function myBlogAvatar(codiceCommento,autore,stile){
    //scrivo lo span
    //var myBlogSpan = "myBlog-" + codiceCommento;
    //document.write("<span id='" + myBlogSpan + "'><i>myBlogLog...</i></span>");

    //metto tutto minuscolo perchè indexOf è case sensitive

    if (autore != ""){
    alt="MyBlogLog: " + autore;

    myBlog = "<a target='_blank' href=\"http://www.mybloglog.com/buzz/co_redir.php?href=" + autore + "\" rel='nofollow'><img src=\"http://pub.mybloglog.com/coiserv.php?href=" + autore + "\" alt=\"" + alt + "\" title=\"" + alt + "\" border=\"1\" class=\"myBlogAvatar\" width=\"50px\" height=\"50px\"></a>";
    //myLayer(myBlogSpan).innerHTML = myBlog + myLayer(myBlogSpan).innerHTML;
    //myLayer(myBlogSpan).innerHTML = myBlog;
    document.write(myBlog);
    }
    }
    //]]>
    </script>
  • Search this code in your template code.
    <b:loop values='data:post.comments' var='comment'>
    And then add this code right after that ones.
    <div style='border:0;float:left;margin: 0 5px 0 0;'>
    <script>
    myBlogAvatar('<data:comment.id/>','<data:comment.authorUrl/>');
    </script>
    </div>
  • Save your template
There are something that we should to know when we have install MyBlogLog avatar in our comments form.
  1. MyBlogLog avatars are linked to the URL of your blog. So we must change comment setting. We would need to change our settings for comments, and enable "anyone" to comment, rather than only registered users.
    Comments Setting
  2. To avoid double image between MyBlogLog avatar and Blogger profile image, we should make disable "profile images on comments" in our comments setting.
    Comments Setting
  3. If you are not a MyBlogLog member, you should register your blog first in MyBlogLog. Click this link to get it......MyBlogLog


We can install another hack for your comments form, Comment Numbering Trick

Best Regard
One-4-All

Read More

Browse > Home / / Sexy Social Bookmarking


Sexy Social Bookmarking

10 comments
Wednesday, July 29, 2009 Posted by One-4-All

sexySocial bookmarking is one of the important tools to promote our blog, can be by the other person (visitor) or by self to bookmarking it. To give an easy way for our visitor if they want bookmarking our blog or our article, we can add social bookmarking feature inline our post. So, if they want to do it, just click and it will go to social bookmarking website. I was put it into my blog. And the result will be like this one. It was called "Sexy Social Bookamrking".
sexy bookmarking
Are you interesting? I will show you how to add this social bookmark into your blog.

Sexy Social Bookmarking Installation

  • first step: Go to your blogger account

  • second step: Click Layout Tab

  • third step: Click "Edit HTML" Tab and check "Expand Widget Templates" option

  • fourth step: add this CSS code into your template. Add this code before ]]</b:skin>

    <style type='text/css'>
    div.sexy-bookmarks {
    height:54px;
    background:url('http://i43.tinypic.com/2ueii3t.png') no-repeat left bottom;
    position:relative;
    width:540px;
    }

    div.sexy-bookmarks span.sexy-rightside {
    width:17px;
    height:54px;
    background:url('http://i43.tinypic.com/2ueii3t.png') no-repeat right bottom;
    position:absolute;
    right:-17px;
    }

    div.sexy-bookmarks ul.socials {
    margin:0 !important;
    padding:0 !important;
    position:absolute;
    bottom:0;
    left:10px;
    }

    div.sexy-bookmarks ul.socials li {
    display:inline-block !important;
    float:left !important;
    list-style-type:none !important;
    margin:0 !important;
    height:29px !important;
    width:48px !important;
    cursor:pointer !important;
    padding:0 !important;
    }

    div.sexy-bookmarks ul.socials a {
    display:block !important;
    width:48px !important;
    height:29px !important;
    font-size:0 !important;
    color:transparent !important;

    }

    .sexy-furl, .sexy-furl:hover, .sexy-digg, .sexy-digg:hover, .sexy-reddit, .sexy-reddit:hover, .sexy-stumble, .sexy-stumble:hover, .sexy-delicious, .sexy-delicious:hover, .sexy-yahoo, .sexy-yahoo:hover, .sexy-blinklist, .sexy-blinklist:hover, .sexy-technorati, .sexy-technorati:hover, .sexy-facebook, .sexy-facebook:hover, .sexy-twitter, .sexy-twitter:hover, .sexy-myspace, .sexy-myspace:hover, .sexy-mixx, .sexy-mixx:hover, .sexy-script-style, .sexy-script-style:hover, .sexy-designfloat, .sexy-designfloat:hover, .sexy-syndicate, .sexy-syndicate:hover, .sexy-email, .sexy-email:hover {
    background:url('http://img509.imageshack.us/img509/3131/sexysprite.png') no-repeat !important;
    }

    .sexy-furl {
    background-position:-300px top !important;
    }
    .sexy-furl:hover {
    background-position:-300px bottom !important;
    }
    .sexy-digg {
    background-position:-500px top !important;
    }
    .sexy-digg:hover {
    background-position:-500px bottom !important;
    }
    .sexy-reddit {
    background-position:-100px top !important;
    }
    .sexy-reddit:hover {
    background-position:-100px bottom !important;
    }
    .sexy-stumble {
    background-position:-50px top !important;
    }
    .sexy-stumble:hover {
    background-position:-50px bottom !important;
    }
    .sexy-delicious {
    background-position:left top !important;
    }
    .sexy-delicious:hover {
    background-position:left bottom !important;
    }
    .sexy-yahoo {
    background-position:-650px top !important;
    }
    .sexy-yahoo:hover {
    background-position:-650px bottom !important;
    }
    .sexy-blinklist {
    background-position:-600px top !important;
    }
    .sexy-blinklist:hover {
    background-position:-600px bottom !important;
    }
    .sexy-technorati {
    background-position:-700px top !important;
    }
    .sexy-technorati:hover {
    background-position:-700px bottom !important;
    }
    .sexy-myspace {
    background-position:-200px top !important;
    }
    .sexy-myspace:hover {
    background-position:-200px bottom !important;
    }
    .sexy-twitter {
    background-position:-350px top !important;
    }
    .sexy-twitter:hover {
    background-position:-350px bottom !important;
    }
    .sexy-facebook {
    background-position:-450px top !important;
    }
    .sexy-facebook:hover {
    background-position:-450px bottom !important;
    }
    .sexy-mixx {
    background-position:-250px top !important;
    }
    .sexy-mixx:hover {
    background-position:-250px bottom !important;
    }
    .sexy-script-style {
    background-position:-400px top !important;
    }
    .sexy-script-style:hover {
    background-position:-400px bottom !important;
    }
    .sexy-designfloat {
    background-position:-550px top !important;
    }
    .sexy-designfloat:hover {
    background-position:-550px bottom !important;
    }
    .sexy-syndicate {
    background-position:-150px top !important;
    }
    .sexy-syndicate:hover {
    background-position:-150px bottom !important;
    }
    .sexy-email {
    background-position:-753px top !important;
    }
    .sexy-email:hover {
    background-position:-753px bottom !important;
    }

    </style>

  • fifth step: add this HTML code after <p><data:post.body/></p> into your blog. If you was used read more trick, there are 2 <p><data:post.body/></p> code in your template. You must add that code after the first code.

    <div class='sexy-bookmarks'>
    <ul class='socials'>
    <li class='sexy-delicious'><a expr:href='&quot;http://del.icio.us/post?url=&quot; + data:post.url + &quot;&amp;title=&quot; + data:post.title' rel='nofollow' target='_blank'/></li>
    <li class='sexy-digg'><a expr:href='&quot;http://digg.com/submit?phase=3&amp;url=&quot; + data:post.url' rel='nofollow' target='_blank'/></li>
    <li class='sexy-technorati'><a expr:href='&quot;http://www.technorati.com/cosmos/search.html?url=&quot; + data:post.url' rel='nofollow' target='_blank'/></li>
    <li class='sexy-reddit'><a expr:href='&quot;http://reddit.com/submit?url=&quot; + data:post.url + &quot;&amp;title=&quot; + data:post.title' rel='nofollow' target='_blank'/></li>
    <li class='sexy-designfloat'><a expr:href='&quot;http://www.designfloat.com/submit.php?u=&quot; + data:post.url + &quot;&amp;t=&quot; + data:post.title' target='_blank'/></li>
    <li class='sexy-facebook'><a href='http://www.facebook.com/sharer.php?u=&quot; + data:post.url + &quot;&amp;t=&quot; + data:post.title' target='_blank'/></li>
    <li class='sexy-twitter'><a href='http://twitthis.com/twit?url=&quot; + data:post.url + &quot;&amp;t=&quot; + data:post.title' target='_blank'/></li>
    <li class='sexy-furl'><a expr:href='&quot;http://www.furl.net/storeIt.jsp?u=&quot; + data:post.url + &quot;&amp;t=&quot; + data:post.title' rel='nofollow' target='_blank'/></li>
    <li class='sexy-syndicate'><a href='your feed URL' title='Subscribe to RSS'/></li>
    <li class='sexy-email'><a href='your email' rel='nofollow' target='_blank'/></li>
    </ul>
    <span class='sexy-rightside'/></div>

  • sixth step: Save your template

  • seventh step: Look up for the result


That is an easy trick right? I hope you enjoy it, and don't forget to bookmark this article.

Best Regard
One-4-All

Read More

Browse > Home / / Numbering Comment Trick


Numbering Comment Trick

2 comments
Wednesday, July 22, 2009 Posted by One-4-All

numbering comment trick

I want a something different with my comment style. another blog have use highlight area for their comment. But, i think it too much used in blogger comment style. What is different style than the other? I think why not use number in my comment. I was saw it, buti was forgot it. And then, i'm use a google search with comment numbering trick keyword, and i find it. I am install it in my blog. and the result will be like this one.
numbering comment trick
To install this comment numbering trick, there are several step that must do to your template.
  • Log in into blogger account.

  • Go to Your layout.

  • Make your comment HTML code become like this one.

  • <b:includable id='comments' var='post'>

    ........

    <dl id='comments-block'>

    <script type='text/javascript'>var CommentsCounter=0;</script>

    <b:loop values='data:post.comments' var='comment'>

    <dt style='clear: both;' class='comment-author' expr:id='"comment-" + data:comment.id'>

    <a expr:name='"comment-" + data:comment.id'/>
    <b:if cond='data:comment.authorUrl'>
    <a expr:href='data:comment.authorUrl' rel='nofollow'>
    <data:comment.author/>
    </a>
    <b:else/>
    <data:comment.author/>
    </b:if>
    <data:commentPostedByMsg/>

    <span class='comment-number' style='float: right; font-size: 20px;'>
    <a expr:href='data:comment.url' title='Comment Link'>
    <script type='text/javascript'>
    CommentsCounter=CommentsCounter+1;
    document.write(CommentsCounter)
    </script>
    </a>
    </span>


    </dt>

    <dd class='comment-body'>
    .......
    </dd>

    </b:loop>
    </dl>

  • Highlight code can be change with a font-size that suitable with your template

  • Now, we are finish with a basic step. you can save now, but if you want add CSS style for this numbering comment trick. if you want use CSS, add this CSS code into your template. Make sure that you are add this CSS before ]]</b:skin>

  • .comment-number {
    float: right;
    background: url(http://i40.tinypic.com/14tmp9e.jpg) no-repeat;
    width:53px;
    height:53px;
    padding:5px 0 0 0;
    margin-right: 5px;
    margin-top: -20px; /*comments-counter position*/
    text-align: center;
    font-family: 'Century Gothic','Lucida Grande',Arial,Helvetica,Sans-Serif;
    font-size: 18px;
    font-weight: bold;
    }

    /*since the numbers are actually links, we need to force the color properties*/

    .comment-number a:link, .comment-number a:visited {
    color: #445566 !important;
    text-decoration: none !important;
    }
    .comment-number a:hover, .comment-number a:active {
    color: #FF9933 !important;
    text-decoration: none !important;
    }

  • Save your template

  • look for the result


  • If you are get problem with the result (ex. comment numbering position), you can fix it with adjust this point.
    margin-right: 5px;
    margin-top: -20px;


    Best regard

    One-4-All

    Read More

    Browse > Home / / Static Widget For Adsense


    Static Widget For Adsense

    7 comments
    Thursday, July 16, 2009 Posted by One-4-All

    One of most important thing for our adsense is a visibility. Adsense with have a high visibility have more possibility to click by our visitor. So, i have an idea to make our adsense always can be see by our visitor. I call it "Static Widget". Why i call it?, because our adsense will be static or no move in visitor monitor. So, i think it's very have high visibility. Want to know how it look like? This widget will be like this.static widget for adsense
    I have using it in my blog. tipsandcara and Blogger Template Place. I hope this will help me to get high click for my adsense. Do you want to apply this style for yours adsense? I will give trick how to make it in your blog.

    Installation Static Widget For Adsense

    1.Go to your Blogger Account
    2.Click "Layout" Tab.
    3.Click "Edit HTML" tab.
    4.Add this CSS code into your template before ]]></b:skin>


    5.And then you must add a section for a widget into your template. Find this code <body>, and then paste this code.


    6.And then go to "Page Elements" option
    7.There are a new section on your page element.
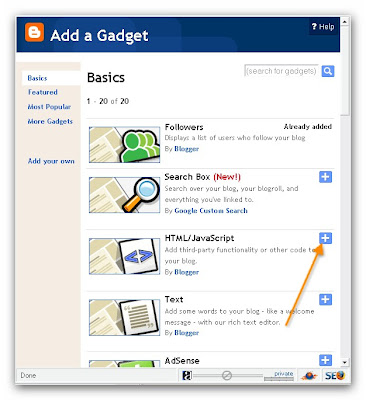
    Click "add widget".
    static widget for adsense
    And then click "HTML/Javascript"
    static widget for adsense
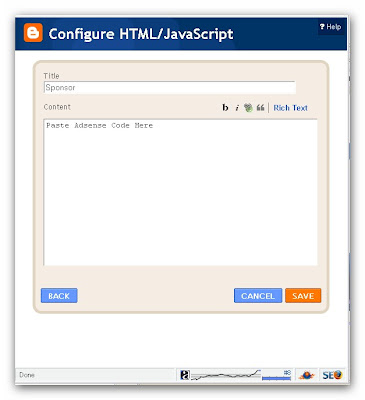
    and paste your adsense code in that form.
    static widget for adsense
    8.Save your edited template

    Now you have a static widget for adsense.
    Best Regard

    One-4-All
    nb. that widget can be also use for another thing, like shout mix, Banner, etc.

    Read More

    Browse > Home / / Automatic Read More


    Automatic Read More
    2 comments
    Monday, July 13, 2009 Posted by One-4-All

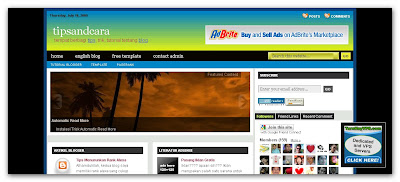
    I'm sure that you are know about read more. We are using read more in our blog to make our article will be appear separately. Some article show in the first page (main blog URL), and the last article are hidden. There are a lot of type of read more, for example is " automatic read more ". Automatic read more is one of read more type that we use to make our article will be display a half, and the last article will be shown if someone click article URL. But, this read more trick have the advantages than the other type. We shouldn't type a little bit of code in our posting like the others. We just type an article as we usually write it. If we use manual read more trick, we must write <span class='fullpost'> and </span>.

    Installation and Customization

    There are two main HTML codes we need to add in our templates, so the hack can work properly. These should be added from ‘Edit HTML,’ in our Blogger Dashboards, with the widget templates expanded.

    First, add this script to your template before </head>


  • var thumbnail_mode = "float" ; have meaning that a picture in our article will be diplay or float to the left. If you wan't to use this style, change "float" to "no-float".

  • summary_noimg = 250; have a meaning quantity of characters that will be displayed if the article doesn't have a picture or image

  • summary_img = 250; have a meaning quantity of characters that will be displayed if the article have a picture or image

  • img_thumb_height = 120; is height size of image

  • img_thumb_width = 120; is the width size of image


  • After add that script, find out of this code. <data:post.body/>.
    And then after you find it, change with this one.


    Now you have a new read more trick in your blog. Just type your article and don't thing about anything, and read more trick will be working for your post.

    Best regard

    One-4-All

    thank to : Quite Random for this stuff.

    Read More

    Browse > Home / / Another ways to upload javascript


    Another ways to upload javascript

    3 comments
    Thursday, June 25, 2009 Posted by One-4-All

    JavaScript is a scripting language used to enable programmatic access to objects within other applications. It is primarily used in the form of client-side JavaScript for the development of dynamic websites. JavaScript is a dialect of the ECMAScript standard and is characterized as a dynamic, weakly typed, prototype-based language with first-class functions (ref. wikipedia). Javascript can make our blog have a good look and more attractive. I used it in another blog (tipsandcara). To use javascript, we must upload it to web. I have been using a free webhosting, like ripway or hotlinkfiles. But, someday my blog have a bad conditions. My javascript doesn't work. Why it's can be happened? and the answer is my javascript files was deleted, have reach bandwith, or something else. It's a risks if we use a free hosting. But we can upload the script into our template (blogger template) with use a little trick.
    When you want insert javascript code into blogger template use this style.

    <script type='text/javascript'>
    //<![CDATA[
    Javascript code
    //]]>
    </script>


    And then put that code between this code ]]></b:skin> and </head>

    Like this one.
    ]]></b:skin>
    <script type='text/javascript'>
    //<![CDATA[
    Javascript code
    //]]>
    </head>


    Hopefully that way can solve our problem.

    Best Regard
    One-4-All

    Read More
    Browse > Home / / Change Template Without Delete Widget


    Change Template Without Delete Widget

    7 comments
    Monday, June 22, 2009 Posted by One-4-All

    One thing that we don't like when we change our template is lose our recent widget. If we change our template, we must install a new ones. Sometime i thing how to change our template without delete widgets. Someone was told me to copy a widgets code before change a template. But how? it's not clearly enough. until, i found the trick to make it become true.
    It's a simple trick, just copy a code and then paste in a new template code.
    still confused? Don't worry, i will try to explain how to change a template without remove or delete our widgets.

    1. Copy a widget code in our current template.
    To copy that code, go to layout and then click "Edit HTML". Don't check "Expand Widgets Template" option to make more easy. And then paste that code into wordpad, ore notepad.


    2. Upload a new template.

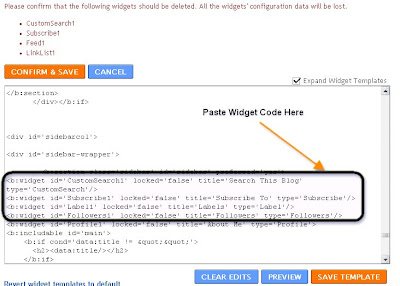
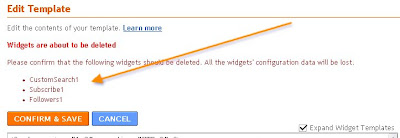
    3. When there are appear an instruction to delete a recent widgets, do not confirm it. But we must search sidebar or footer area.


    4. After you find that area, paste a widget code that we have copied before.


    5. save a template.

    6. Go to "Page Element", and rearrange your widgets and save.

    7. Look up for a result.

    Easy and so simple right? Now, we can change our template whenever we like without worry to install a new widgets.

    HOpe this article will be useful for us.
    best regard

    One-4-All

    Read More
    Browse > Home / / Related Post Widget


    Related Post Widget

    10 comments
    Tuesday, June 16, 2009 Posted by One-4-All

    There are a several ways to promotion our blog to public, but i classify it into two class, external promotion and internal promotion. External promotion is like register our blog to search engine, blog directory, social bookmarking web, twitter, forum and use advertise our blog. The second thing is internal promotion. What is internal promotion? Internal promotion is the ways to promotion our blog with optimization our blog, like use navigation bar, drop down archieve menu, and related posts widget. With that tools, a visitors can be easy to explore our blog. In this post, i would to explain how to make Related Posts Widget for our blog.
    I think everybody was know what the meaning of related posts. Related posts is another post that have similar topic or content to the articles that are read by visitor. For example it's look like this one.

    To install this widget, we must do some thing with our template. 1. Login to your blogger account.
    2. Go to your template layout.
    3. Go to "Edit HTML".
    4. Click the "Expand Widget Templates" option.
    5. Insert this code into your template above </head> code.

    you can adjust the width of the widgets according to the needs or circumstances template or template condition. 6. Now search this text

    Now replace the above text with this code


    7. Now scroll down still you can find ending tag for either or . Now paste the following script below the ending div / span tag.

    8. Save your template.
    9. Look up the result, and now you have Related Posts Widget.

    And the last, i want to thank for mohamed rias for the tutorial.
    Hope this useful for use. Best Regard One-4-All

    Read More

    Browse > Home / / Auto Hide Comment


    Auto Hide Comment

    14 comments
    Friday, June 12, 2009 Posted by One-4-All

    Comment
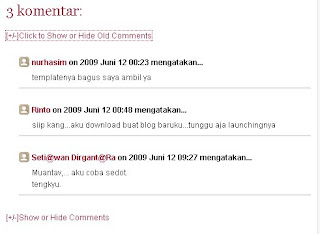
    Comment are one of feature in blog area. I think, there are one of important things. People leave critics, suggest, appreciate, or maybe in some questions use this feature. There are some blogs with have a lot of comment for their article. And if we want to leave comment in that blog which have a lot of comment, we must scroll down our mouse to find comment form. It’s will make some visitor uncomfortable. But, I think that problem can be solve. We can hide that comment. But not for permanently . It can be show again with click. I call it, “AUTO HIDE COMMENT” trick. If we used this trick, our comment area will be shown like this one.

    Comment

    If we click it, the comment wil be appear.


    Comment

    For applied this trick, we must edit your HTML code in several steps. But don’t worry, it’s easy step. Go to your template and then cek check “Expand Widget Templates” option, and then do this steps.

    1. Add this code before ]]></b:skin>
    .commenthidden {display:none}
    .commentshown {display:inline}

    2. Look up for this code <dl id='comments-block'>. And then add this code before it,
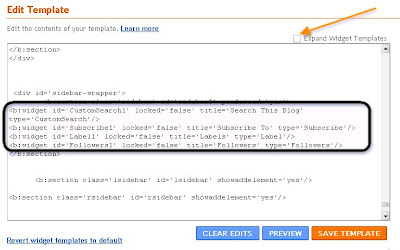

    Scroll down your mouse and find until you find </b:loop>, it’s usually before this code “<b:if cond="data:post.commentPagingRequired"> “.
    And then paste again this “ <a aiotitle='Hide Comments' href='javascript:togglecomments(&quot;hideshow&quot;)'>[+/-]Click to Show or Hide Old Comments</a> “ after </b:loop>.

    3. The last step is add some script to your template.


    You must add before </head>.

    4.Save your template. And then see for the result.
    You can change “ [+/-]Click to Show or Hide Old Comments “ with you want.

    Now you have applied this trick.
    Enjoy it’s, and don’t forget to bookmark it’s if you like this article.

    Best regard.
    One-4-All

    Read More