When i was look for web or blog who can publish my converted template in their own web, i found some toolbar. The toolbar with a lot of function. I think it is a lovely toolbar. Like i said before that this toolbar have a lot of function, like integrated a recent post, subscribe feature, share to social bookmarking button, translate, and a lot of another features. It is from wibiya. So i call it Wibiya Toolbar.
 Wibiya toolbar is free service that offer by wibiya. You can install this toolbar into your blog or web. This toolbar is available from any blogging, like a blogspot, wordpress, Typepad and another platform. I have installed this toolbar in my blog, Blogger Template place and in this blog. Look up in the bottom area.
To install this toolbar, first you must ask to Wibiya.com to join or get this toolbar. You will get notification from Wibiya when your account or your web get approved. I have get this notification in 2 or 3 day business. So wait it.
After you get notification, you can installed it with easy step into your blog or web. I want share installation step then i mean above.
Get this toolbar for you blog or web, and make your visitor have a nice navigation to explore your blog.
Another blogger trick, you can install avatar on your blog comment or you can install Related Post Widget. Look up this article Install Avatar and Related Post Widget for get this trick.
Best Regard
One-4-All
 Wibiya toolbar is free service that offer by wibiya. You can install this toolbar into your blog or web. This toolbar is available from any blogging, like a blogspot, wordpress, Typepad and another platform. I have installed this toolbar in my blog, Blogger Template place and in this blog. Look up in the bottom area.
To install this toolbar, first you must ask to Wibiya.com to join or get this toolbar. You will get notification from Wibiya when your account or your web get approved. I have get this notification in 2 or 3 day business. So wait it.
After you get notification, you can installed it with easy step into your blog or web. I want share installation step then i mean above.
- Looking up for notification email from Wibiya in your mail. That notification email consist a activation link to activate your wibiya account. Click that activation link and you will redirect to login screen in wibiya.
- When you was login into wibiya.com, you will be ask to input your blog information.

- Next step is you will ask to choose a toolbar that you want to install in your blog.
 They offer a lot of different color. You can choose the best one for your blog.
 - After you choose the toolbar, you will asked to choose a features that you want install in that toolbar.
- If you have recent post feature (feed) and twitter for your toolbar, you must fill a feed address and your twitter ID.

And then click "Next" - When you click next button, there are a question about blogging platform. I have used blogger platform for my blog, so i click blogger icon on that screen
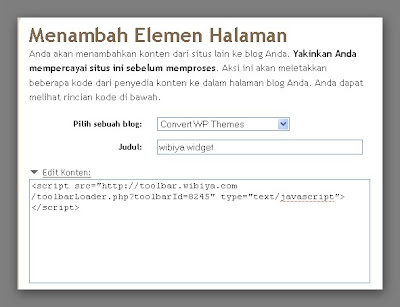
- When you click blogger platform, your browsing screen will get get a pop up notification. Allowed it, and you will see installation wizard. You can use automatic installation wizard, or you can install by your self. I choose to install by my self. When you choose to install by your self you must click "edit content" and you will see a script. Copy that script and paste into your blog template before </body>.

- Save your template
Get this toolbar for you blog or web, and make your visitor have a nice navigation to explore your blog.
Another blogger trick, you can install avatar on your blog comment or you can install Related Post Widget. Look up this article Install Avatar and Related Post Widget for get this trick.
Best Regard
One-4-All


0 comments:
Post a Comment