Browse > Home / / Sexy Social Bookmarking


Sexy Social Bookmarking

10 comments
Wednesday, July 29, 2009 Posted by One-4-All

sexySocial bookmarking is one of the important tools to promote our blog, can be by the other person (visitor) or by self to bookmarking it. To give an easy way for our visitor if they want bookmarking our blog or our article, we can add social bookmarking feature inline our post. So, if they want to do it, just click and it will go to social bookmarking website. I was put it into my blog. And the result will be like this one. It was called "Sexy Social Bookamrking".
sexy bookmarking
Are you interesting? I will show you how to add this social bookmark into your blog.

Sexy Social Bookmarking Installation

  • first step: Go to your blogger account

  • second step: Click Layout Tab

  • third step: Click "Edit HTML" Tab and check "Expand Widget Templates" option

  • fourth step: add this CSS code into your template. Add this code before ]]</b:skin>

    <style type='text/css'>
    div.sexy-bookmarks {
    height:54px;
    background:url('http://i43.tinypic.com/2ueii3t.png') no-repeat left bottom;
    position:relative;
    width:540px;
    }

    div.sexy-bookmarks span.sexy-rightside {
    width:17px;
    height:54px;
    background:url('http://i43.tinypic.com/2ueii3t.png') no-repeat right bottom;
    position:absolute;
    right:-17px;
    }

    div.sexy-bookmarks ul.socials {
    margin:0 !important;
    padding:0 !important;
    position:absolute;
    bottom:0;
    left:10px;
    }

    div.sexy-bookmarks ul.socials li {
    display:inline-block !important;
    float:left !important;
    list-style-type:none !important;
    margin:0 !important;
    height:29px !important;
    width:48px !important;
    cursor:pointer !important;
    padding:0 !important;
    }

    div.sexy-bookmarks ul.socials a {
    display:block !important;
    width:48px !important;
    height:29px !important;
    font-size:0 !important;
    color:transparent !important;

    }

    .sexy-furl, .sexy-furl:hover, .sexy-digg, .sexy-digg:hover, .sexy-reddit, .sexy-reddit:hover, .sexy-stumble, .sexy-stumble:hover, .sexy-delicious, .sexy-delicious:hover, .sexy-yahoo, .sexy-yahoo:hover, .sexy-blinklist, .sexy-blinklist:hover, .sexy-technorati, .sexy-technorati:hover, .sexy-facebook, .sexy-facebook:hover, .sexy-twitter, .sexy-twitter:hover, .sexy-myspace, .sexy-myspace:hover, .sexy-mixx, .sexy-mixx:hover, .sexy-script-style, .sexy-script-style:hover, .sexy-designfloat, .sexy-designfloat:hover, .sexy-syndicate, .sexy-syndicate:hover, .sexy-email, .sexy-email:hover {
    background:url('http://img509.imageshack.us/img509/3131/sexysprite.png') no-repeat !important;
    }

    .sexy-furl {
    background-position:-300px top !important;
    }
    .sexy-furl:hover {
    background-position:-300px bottom !important;
    }
    .sexy-digg {
    background-position:-500px top !important;
    }
    .sexy-digg:hover {
    background-position:-500px bottom !important;
    }
    .sexy-reddit {
    background-position:-100px top !important;
    }
    .sexy-reddit:hover {
    background-position:-100px bottom !important;
    }
    .sexy-stumble {
    background-position:-50px top !important;
    }
    .sexy-stumble:hover {
    background-position:-50px bottom !important;
    }
    .sexy-delicious {
    background-position:left top !important;
    }
    .sexy-delicious:hover {
    background-position:left bottom !important;
    }
    .sexy-yahoo {
    background-position:-650px top !important;
    }
    .sexy-yahoo:hover {
    background-position:-650px bottom !important;
    }
    .sexy-blinklist {
    background-position:-600px top !important;
    }
    .sexy-blinklist:hover {
    background-position:-600px bottom !important;
    }
    .sexy-technorati {
    background-position:-700px top !important;
    }
    .sexy-technorati:hover {
    background-position:-700px bottom !important;
    }
    .sexy-myspace {
    background-position:-200px top !important;
    }
    .sexy-myspace:hover {
    background-position:-200px bottom !important;
    }
    .sexy-twitter {
    background-position:-350px top !important;
    }
    .sexy-twitter:hover {
    background-position:-350px bottom !important;
    }
    .sexy-facebook {
    background-position:-450px top !important;
    }
    .sexy-facebook:hover {
    background-position:-450px bottom !important;
    }
    .sexy-mixx {
    background-position:-250px top !important;
    }
    .sexy-mixx:hover {
    background-position:-250px bottom !important;
    }
    .sexy-script-style {
    background-position:-400px top !important;
    }
    .sexy-script-style:hover {
    background-position:-400px bottom !important;
    }
    .sexy-designfloat {
    background-position:-550px top !important;
    }
    .sexy-designfloat:hover {
    background-position:-550px bottom !important;
    }
    .sexy-syndicate {
    background-position:-150px top !important;
    }
    .sexy-syndicate:hover {
    background-position:-150px bottom !important;
    }
    .sexy-email {
    background-position:-753px top !important;
    }
    .sexy-email:hover {
    background-position:-753px bottom !important;
    }

    </style>

  • fifth step: add this HTML code after <p><data:post.body/></p> into your blog. If you was used read more trick, there are 2 <p><data:post.body/></p> code in your template. You must add that code after the first code.

    <div class='sexy-bookmarks'>
    <ul class='socials'>
    <li class='sexy-delicious'><a expr:href='&quot;http://del.icio.us/post?url=&quot; + data:post.url + &quot;&amp;title=&quot; + data:post.title' rel='nofollow' target='_blank'/></li>
    <li class='sexy-digg'><a expr:href='&quot;http://digg.com/submit?phase=3&amp;url=&quot; + data:post.url' rel='nofollow' target='_blank'/></li>
    <li class='sexy-technorati'><a expr:href='&quot;http://www.technorati.com/cosmos/search.html?url=&quot; + data:post.url' rel='nofollow' target='_blank'/></li>
    <li class='sexy-reddit'><a expr:href='&quot;http://reddit.com/submit?url=&quot; + data:post.url + &quot;&amp;title=&quot; + data:post.title' rel='nofollow' target='_blank'/></li>
    <li class='sexy-designfloat'><a expr:href='&quot;http://www.designfloat.com/submit.php?u=&quot; + data:post.url + &quot;&amp;t=&quot; + data:post.title' target='_blank'/></li>
    <li class='sexy-facebook'><a href='http://www.facebook.com/sharer.php?u=&quot; + data:post.url + &quot;&amp;t=&quot; + data:post.title' target='_blank'/></li>
    <li class='sexy-twitter'><a href='http://twitthis.com/twit?url=&quot; + data:post.url + &quot;&amp;t=&quot; + data:post.title' target='_blank'/></li>
    <li class='sexy-furl'><a expr:href='&quot;http://www.furl.net/storeIt.jsp?u=&quot; + data:post.url + &quot;&amp;t=&quot; + data:post.title' rel='nofollow' target='_blank'/></li>
    <li class='sexy-syndicate'><a href='your feed URL' title='Subscribe to RSS'/></li>
    <li class='sexy-email'><a href='your email' rel='nofollow' target='_blank'/></li>
    </ul>
    <span class='sexy-rightside'/></div>

  • sixth step: Save your template

  • seventh step: Look up for the result


That is an easy trick right? I hope you enjoy it, and don't forget to bookmark this article.

Best Regard
One-4-All

Read More

Browse > Home / / Find Your Keywords With Google Keyword Tools


Find Your Keywords With Google Keyword Tools

4 comments
Friday, July 24, 2009 Posted by One-4-All

keywordsKeywords in important thing for our blog. This can give an effect for our blog SEO. Many blog put keywords in meta tag. Of course, the keywords that they putted into meta tag was related with their blog content. Why keyword is so important for SEO? because it was used by people when they use search engine to search to want to looking for. For example if someone was looking for a template, maybe he was used "blogger template", "free template", "magazine template", "free download template" or something else for a keywords. And the search engine will be looking for that words.
You have put a keyword for your blog? if you doesn't put a keywords into your blog, i suggest put it now. I was put a keywords for my blog, and i put like this one.
meta tag keywords
I think you was have to know where is to put the keyword in your template. But i want to share how to find the right keywords for your blog. Now, you can find what is the right keyword for your blog with the easy way, use "Google Keyword Tools".
google keyword tools Like i said before, it was to easy to know a suggestion keyword for our blog. Click "radio button" with the website content option, and then just type your blog url and click "Get Keyword Ides" button. And not for a long time, the suggestion keyword will be appear in your monitor. I have tried it for my blog with have content about template. And the suggestion keyword from Google Keyword Tools are:
google keyword tools
It so simple. I suggest you to use or try this keywords tools.

Best regard

One-4-All

Read More

Browse > Home / / Numbering Comment Trick


Numbering Comment Trick

2 comments
Wednesday, July 22, 2009 Posted by One-4-All

numbering comment trick

I want a something different with my comment style. another blog have use highlight area for their comment. But, i think it too much used in blogger comment style. What is different style than the other? I think why not use number in my comment. I was saw it, buti was forgot it. And then, i'm use a google search with comment numbering trick keyword, and i find it. I am install it in my blog. and the result will be like this one.
numbering comment trick
To install this comment numbering trick, there are several step that must do to your template.
  • Log in into blogger account.

  • Go to Your layout.

  • Make your comment HTML code become like this one.

  • <b:includable id='comments' var='post'>

    ........

    <dl id='comments-block'>

    <script type='text/javascript'>var CommentsCounter=0;</script>

    <b:loop values='data:post.comments' var='comment'>

    <dt style='clear: both;' class='comment-author' expr:id='"comment-" + data:comment.id'>

    <a expr:name='"comment-" + data:comment.id'/>
    <b:if cond='data:comment.authorUrl'>
    <a expr:href='data:comment.authorUrl' rel='nofollow'>
    <data:comment.author/>
    </a>
    <b:else/>
    <data:comment.author/>
    </b:if>
    <data:commentPostedByMsg/>

    <span class='comment-number' style='float: right; font-size: 20px;'>
    <a expr:href='data:comment.url' title='Comment Link'>
    <script type='text/javascript'>
    CommentsCounter=CommentsCounter+1;
    document.write(CommentsCounter)
    </script>
    </a>
    </span>


    </dt>

    <dd class='comment-body'>
    .......
    </dd>

    </b:loop>
    </dl>

  • Highlight code can be change with a font-size that suitable with your template

  • Now, we are finish with a basic step. you can save now, but if you want add CSS style for this numbering comment trick. if you want use CSS, add this CSS code into your template. Make sure that you are add this CSS before ]]</b:skin>

  • .comment-number {
    float: right;
    background: url(http://i40.tinypic.com/14tmp9e.jpg) no-repeat;
    width:53px;
    height:53px;
    padding:5px 0 0 0;
    margin-right: 5px;
    margin-top: -20px; /*comments-counter position*/
    text-align: center;
    font-family: 'Century Gothic','Lucida Grande',Arial,Helvetica,Sans-Serif;
    font-size: 18px;
    font-weight: bold;
    }

    /*since the numbers are actually links, we need to force the color properties*/

    .comment-number a:link, .comment-number a:visited {
    color: #445566 !important;
    text-decoration: none !important;
    }
    .comment-number a:hover, .comment-number a:active {
    color: #FF9933 !important;
    text-decoration: none !important;
    }

  • Save your template

  • look for the result


  • If you are get problem with the result (ex. comment numbering position), you can fix it with adjust this point.
    margin-right: 5px;
    margin-top: -20px;


    Best regard

    One-4-All

    Read More

    Browse > Home / / 7 SEO Tips


    7 SEO Tips

    5 comments
    Monday, July 20, 2009 Posted by One-4-All


    SEO, Search engine optimization is one of thing that are very important for our blog. With great SEO, we can get a lof of traffic from seacrh engine. How we have a great SEO? It's also my dream. But when i blogwlaking to another great blog, i have a great article about my SEO. It's call 7 SEO tips. Now i want to share it for all in my blog.

    There is a saying, "Content is king". And it’s 100% true. A blog is known from it’s quality. It does not make any sense if you are having some thousand posts, but having a handful of quality posts matters. So, we all should know the ways and tricks of posting powerful contents. Here, I will tell you the most important 7 SEO tips that you need to follow before posting an article.
    Few times we feel that we have quality contents, a nice theme, still why we have less readers! And the simple answer is lack of SEO knowledge. SEO is like the bus who brings passengers. And if you have not made your bus stop look like a bus stop, then no passenger will stop there. So, the thing is that how you present your blog.
    We make contents for people. But people don’t know us. People know search engines. So, we have to get known by the search engines so that they will start referring us to those people. And this is not that much difficult also. By following some simple ways, you can achieve that easily. It may take some time, but after sometime, you will be there, rocking!

    At first lets learn some quick SEO tips. You need to follow these tips while posting your future articles. Keep one thing in mind, these SEO rules are not optional, they are complusory if you want to stand tall in this race. Lets discuss about those tips now.

    7 SEO Tips

    1. Post Title : Post title is one of the leading SEO factors. People get the idea about your post from your post title. And remember, search engines put a high value to this. So, your post title should be eye catchy. It should contain your post’s keywords. Do not repeat your keywords in the post title. One keyword is just enough. Keep it short and try not to go beyond 10 words.

    2. Grammar : Do not take people for granted. They are on your site to know something, and excessive grammar mistakes will make them annoyed. If you are familiar with the common blogging language, i.e english, then go on. But if you are not, then try to keep your post short. Just post the important things and do not try to go more than that. Few times we want to do good, but in the end we feel allas!

    3. Numbers : This is a very cool and interesting observation. Let me explain this with an example. If we make a search with a word "seo tips" on google, we will get different results.
    This is most expected that people will click on the first one which says "21 Essential SEO Tips & Techniques" in stead of "Dreamsubmitting SEO TIPS". Because people will think that "21 Essential SEO Tips & Techniques" is providing some accurate tips. So, try to write post names as "7 SEO Tips Before Posting An Article" or "50 Blogger Templates Download" etc.

    4. Images : A single image is equal to thousands of words. So, try to use 2/3 images in your posts. People really get bored when they see large no of text words. A image can convince them the theme that you are talking about. And also, image looks nice to eyes. Most important thing is that use proper image values. Give an alternate tag (alt) to your image. Add title to it. Do not think that only posts bring visitors. If you SEO images properly, then images will also bring you people by images searches.

    5. Colors/Highlighters : Lets assume that your post contents some 1200+ words. Now after publishing your post, a Googlebot will come to your post and will read that. But you need the Googlebot to put more weightage on your keywords. So, you need to highlight your keywords out of those 1200+ posts. Simply bold your keyword once or twice in your post. You can also use different colours to highlight them. Remember that there is no specific rule for it. So, you can go ahead and make them italic or underlined. The main aim is to make your keywords standout. In this way the bots will give more weightage to those words. This is a cool SEO tip. Look at the screen shot below to get the idea.

    6. Presentation : We are here to interact with readers with our post. We are not here to look fancy. Do not ever write posts with fancy letters. Follow simple sentence building tips. For an example: dOnT wRiTe Lyk Dis sIncE iT MaKeS YoU LoOk sTuPiD AnD TiReS YouR fInGeRs N yOuR ShIfT BuTtOn MaY BrEaK DoWn. Bots will treat these formats as spam posts and there is a very little chance for your post to get indexed. Even if you get indexed in search ebgines, you will never come in the top lists. Simplicity is still the best way to present. If you are providing tips or something, then use list format, so that the post will look organized. Use paragraphs to keep your views. Never use capital letters.


    Best Regard

    One-4-All
    nb. thank for Solid Blogger

    Read More

    Browse > Home / / My Blog Comment Get Problem


    My Blog Comment Get Problem

    2 comments
    Friday, July 17, 2009 Posted by One-4-All

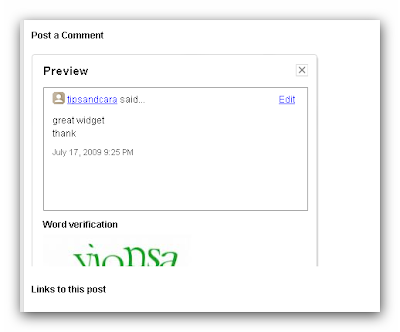
    I have told by my friend that he can't send his comment on my blog. He said when he write and click send, automatically will appear verification anti spam code but she cannot write the code. It was caused the fill to write verification code doesn't appear. And then i check it by my self. And it true, i can't send my comment too.

    I try to know what was happened in my blog. I think i doesn't edit my template for couple day ago. When i still thinking about it, i see there is different with blogger comment today. Now when i try to post my comment, there appear preview of my written comment. it was causing a verification code fill wasn't appeared.
    comment
    Now, i will focus to know why my comment form was can't be scroll down. I go to my template code and find source of comment form. I found the root cause of this problem. It was caused by my comment form setting. My comment form setting in my template wasn't use a scroll feature, so i change it.
    comment
    My comment form source code have this statement " scrolling='no' " and i change into " scrolling='yes' ". The problem was gone.

    If you have the same problem in your blog, try this one. and i hope my article "My Blog Comment Get Problem" is useful for us.

    best regard
    One-4-All

    Read More

    Browse > Home / / Static Widget For Adsense


    Static Widget For Adsense

    7 comments
    Thursday, July 16, 2009 Posted by One-4-All

    One of most important thing for our adsense is a visibility. Adsense with have a high visibility have more possibility to click by our visitor. So, i have an idea to make our adsense always can be see by our visitor. I call it "Static Widget". Why i call it?, because our adsense will be static or no move in visitor monitor. So, i think it's very have high visibility. Want to know how it look like? This widget will be like this.static widget for adsense
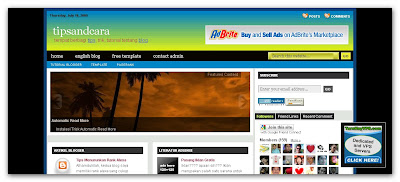
    I have using it in my blog. tipsandcara and Blogger Template Place. I hope this will help me to get high click for my adsense. Do you want to apply this style for yours adsense? I will give trick how to make it in your blog.

    Installation Static Widget For Adsense

    1.Go to your Blogger Account
    2.Click "Layout" Tab.
    3.Click "Edit HTML" tab.
    4.Add this CSS code into your template before ]]></b:skin>


    5.And then you must add a section for a widget into your template. Find this code <body>, and then paste this code.


    6.And then go to "Page Elements" option
    7.There are a new section on your page element.
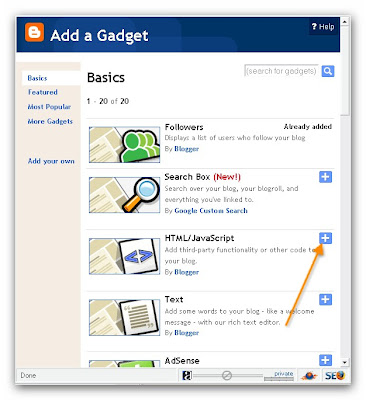
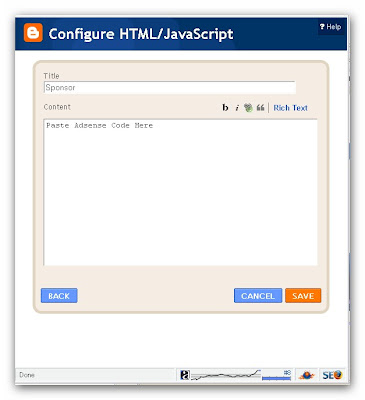
    Click "add widget".
    static widget for adsense
    And then click "HTML/Javascript"
    static widget for adsense
    and paste your adsense code in that form.
    static widget for adsense
    8.Save your edited template

    Now you have a static widget for adsense.
    Best Regard

    One-4-All
    nb. that widget can be also use for another thing, like shout mix, Banner, etc.

    Read More

    Browse > Home / / Automatic Read More


    Automatic Read More

    3 comments
    Monday, July 13, 2009 Posted by One-4-All

    I'm sure that you are know about read more. We are using read more in our blog to make our article will be appear separately. Some article show in the first page (main blog URL), and the last article are hidden. There are a lot of type of read more, for example is " automatic read more ". Automatic read more is one of read more type that we use to make our article will be display a half, and the last article will be shown if someone click article URL. But, this read more trick have the advantages than the other type. We shouldn't type a little bit of code in our posting like the others. We just type an article as we usually write it. If we use manual read more trick, we must write <span class='fullpost'> and </span>.

    Installation and Customization

    There are two main HTML codes we need to add in our templates, so the hack can work properly. These should be added from ‘Edit HTML,’ in our Blogger Dashboards, with the widget templates expanded.

    First, add this script to your template before </head>


  • var thumbnail_mode = "float" ; have meaning that a picture in our article will be diplay or float to the left. If you wan't to use this style, change "float" to "no-float".

  • summary_noimg = 250; have a meaning quantity of characters that will be displayed if the article doesn't have a picture or image

  • summary_img = 250; have a meaning quantity of characters that will be displayed if the article have a picture or image

  • img_thumb_height = 120; is height size of image

  • img_thumb_width = 120; is the width size of image


  • After add that script, find out of this code. <data:post.body/>.
    And then after you find it, change with this one.


    Now you have a new read more trick in your blog. Just type your article and don't thing about anything, and read more trick will be working for your post.

    Best regard

    One-4-All

    thank to : Quite Random for this stuff.

    Read More

    Browse > Home / / Template Blogger Tutorial Part 2


    Template Blogger Tutorial Part 2

    1 comments
    Wednesday, July 08, 2009 Posted by One-4-All

    Yesterday i was posted an article about blogger template tutorial. I will continue this tutorial. Before we learn how to make or customize our template, i think we should know about CSS (Cascading Style Sheets) and HTML (Hypertext Markup Language). There are important thing for our template. Now, i start to continue of blogger template tutorial with explaining about CSS.

    Cascading Style Sheets (CSS) is a style sheet language used to describe the presentation (that is, the look and formatting) of a document written in a markup language. Its most common application is to style web pages written in HTML and XHTML, but the language can be applied to any kind of XML document, including SVG and XUL.CSS is designed primarily to enable the separation of document content (written in HTML or a similar markup language) from document presentation, including elements such as the colors, fonts, and layout.

    Usually in blogger template, CSS code was placed in head area (between <head> and </head>). Look up for this picture.

    In this picture, there are several CSS code for body and outer wrapper. In that CSS there are curly bracket {}, (:), and (;). There is the rules when we write CSS. When you write CSS, you place the declaration within curly brackets {}. Properties and values are separated by a colon (:), and property/value pairs are terminated by a semicolon (;).
    There was background, width, padding, margin, border word in that example picture. To know what is the meaning of that word, look up for this picture.


    For example:
    body {
    background: #AAAAAA;
    width: 990px;
    color: #202020;
    font-size: 12px;
    font-family: Arial, Tahoma, Verdana;
    margin: 0px auto 0px;
    padding: 0px;
    }
    Body area with width 990px and background color is grey (#AAAAAA), and than color of body content is black (#202020) with font size 12 px and font type is arial, tahoma or verdana. Body area have margin 0px auto 0px, this have a meaning this area will have margin-top 0px, margin-right and bottom auto (will be center) and margin-left also 0px. and the content of body will have margin 0px.
    Also, there are some area that are use picture as background. To apply your favorite background, we must add picture url to CSS code, like this one.
    body {
    background-image: url(background_image.jpg);
    }
    And the result will be like this.
    body {
    background-image: url(background_image.jpg) no-repeat;
    }
    And the result will be like this.
    body {
    background-image: url(background_image.jpg) repeat-x;
    }
    And the result will be like this.
    body {
    background-image: url(background_image.jpg) repeat-y;
    }
    And the result will be like this.


    Best Regard
    One-4-All

    Read More

    Browse > Home / / Template Blogger Tutorial


    Template Blogger Tutorial

    0 comments
    Monday, July 06, 2009 Posted by One-4-All

    templateI was converted a couple of wordpress template, like: magazine music premium, Wcute, ePhoto. Many of my friends was ask to me how to convert it. I really don't know how to answer that question, because i just do it (convert wordpress template). I just make it into CSS style. Maybe to answer that question, i want to make a tutorial about blogger template. In this tutorial, i will give that all-iknow (all i know). But, before i make article about Template Blogger Tutorial, i want ask apologize if i have mistake in my article.

    Generally, the actual structure of any templates are not exactly the same, but for the most blogs, their template consist of the headers, footers, and posts sections. But there are some sections (I'll call these sections blocks or containers afterward) that are not visible on the computer screen, but important HTML-wise to build a practical and proper working template.
    A template, basically have structure like this:
    template
    Going from the biggest to the smallest blocks:

    1. Body: the outer most block is the Body of your template (basically everything that the computer screen covers).

    2. Outer-wrapper: this container covers your whole template (the body is more like the outside of your template). In general, you build a wrapper to place a multiple of smaller blocks inside it. The most common blocks inside this Outer-wrapper is the Header, Post, Sidebar, and Footer.

    3. Header: this block is the top most part of your blog (the name is quite obvious). But inside the Header you will have other sub-blocks too - the Header Title block, the Header Description block, and others such as the Adsense banners, a menu bar, etc. So, to wrap all these sub-blocks inside one large container, the largest container in the Header section is usually a Header-wrapper that wraps everything inside.

    4. Content: below the Header is the Content-wrapper - basically the most important container block of all. Immediately inside this wrapper are the Sidebar containers (1,2 or any number of sidebars) and the Main container (which contains your posts, comments, or some ads).

    5. Footer: is the bottom most container of your template. As in the Header section, you'll also need a Footer-wrapper to contain other sub-blocks in the Footer section.

    6. Main: the Main-wrapper is the outer most container in the Main section which goes inside the Content-wrapper. Inside this Main-wrapper are the Post block, Comment block, Date Header, and other widgets created from the Add Page Element option.

    7. Sidebar: is the block that contains all your side widgets . In a standard Blogger template, you will usually find only 1 sidebar.

    8. Blog Post: this block contains the important stuff - your Posts Titles, Post, Post Author, Labels, etc.

    Read More

    Browse > Home / / Adsense Secret And Blogger for Dummies ebook


    Adsense Secret And Blogger for Dummies ebook

    7 comments
    Wednesday, July 01, 2009 Posted by One-4-All

    Would you like to make some blog? But you don't know about blog? Or do you want to optimize your adsense? I think you should have this ebook. Adsense secret and blogger for dummies ebook. In this ebook, there are a lot information about how to make a blog and how to optimize your adsense, include clearly tutorial with image. Now, i will share this ebook for you. Free of charge. but if you want for this ebook, just make your blog link to this blog. and i will send it by mail. So, link to this blog, and then leave your message in comment.....I will send it.
    You will receive 2 ebook.

    1. Adsense secret
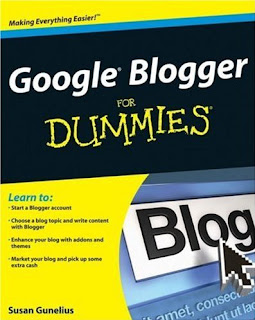
    blogger for dummies


    2. Blogger for dummies

    adsense secret

    Best regard,
    One-4-All

    Read More